
Build torque, not noise—your diy electric pit bike is pure rebellion on wheels, custom speed and grit minus the gas‑guzzling drama.
A diy electric pit bike isn’t just a garage project—it’s a middle finger to gas fumes and a love letter to instant torque. You crack open the throttle and boom—silent launch, dirt flying, neighbors none the wiser. Folks jump in because store‑bought bikes can feel cookie‑cutter, and nobody wants to drop serious cash without knowing what’s under the plastics. Building your own means no mystery meat parts, no guesswork—just raw control over speed, range, and grit.
Grand View Research reports the global electric motorcycle market was valued at $30.1 billion in 2022, climbing at a 21.2% annual rate—proof this isn’t a fad, it’s a freight train.
So here’s the play: learn what makes the motor punch, the battery last, and the frame hold steady when the trail gets rowdy. By the time you hit that first test ride, you won’t just own the bike—you’ll understand it.

3 Essential Tools For Your DIY Pit Bike
Building a diy electric pit bike is hands-on fun, but the right tools keep your electric pit bike build from turning into a headache. When you’re wrenching on a pit bike electric setup, small mistakes can mess with motor power or wiring. These three tools help your diy electric pit bike run hard, smooth, and safe—just how a proper diy ebike project should feel.
Torque Wrench for Precise Motor Power Output
A solid torque wrench is more than a fancy ratchet. On a diy electric pit bike, it protects your frame and keeps motor power tight and clean.
-
Core setup tools
-
Socket set matched to axle nuts and motor bolts
-
Verified calibration before critical tightening
-
Manufacturer torque specifications sheet on hand
-
-
During motor assembly
-
Align engine mounting brackets to the aluminum frame
-
Hand-thread all fasteners to avoid cross-threading
-
Apply torque in a crisscross pattern for even pressure
-
-
Why torque matters for electric pit bike builds
-
Prevents frame stress cracks
-
Maintains peak torque transfer
-
Reduces bolt stretch under hard acceleration
-
For riders using hezzo motor kits, correct torque keeps output consistent and avoids annoying vibration at high RPM.
Multimeter to Verify Rated Motor Voltage
A multimeter keeps your diy electric pit bike wiring honest. Voltage issues can fry a controller fast.
-
Electrical checkpoints
-
Voltage testing across the battery pack terminals
-
Signal checks at the motor controller
-
Continuity checks along wiring and electrical connections
-
-
Troubleshooting flow
-
Measure resting battery voltage
-
Compare with controller input rating
-
Inspect phase and signal wires if readings drift
-
| Test Point | Expected Voltage (48V System) | Action if Out of Range |
|---|---|---|
| Battery Resting | 51–54V | Balance or recharge |
| Under Throttle Load | >46V | Check battery health |
| Controller Input | 48–54V | Inspect fuse/wiring |
| Throttle Signal | 0.8–4.2V | Replace throttle |
| Phase Continuity | <1Ω resistance | Repair wiring |
For any diy electric pit bike or electric mini bike project, this tool saves cash and stress. Many hezzo builders keep one in the toolbox at all times.
Soldering Iron for Secure Brushless DC Motor Connections
Clean wiring separates a clean ride from random cut-outs. A quality soldering iron makes your pit bike electric build reliable.
-
Wiring essentials
-
Lead-free solder wire
-
Proper flux for smooth flow
-
Correct wire stripping tool size
-
-
Connection hierarchy
-
Motor side
-
Seal motor phase wires
-
Reinforce with heat shrink tubing
-
-
Controller side
-
Tight ESC connections
-
Strain relief on high-current leads
-
-
-
Clean joint checklist
-
Heat wire, not solder
-
Flow solder evenly
-
Inspect for dull or cracked joints
-
When building a diy electric pit bike with hezzo components, tight solder joints keep motor power steady and acceleration crisp. No weird surges. Just smooth pull every time you twist the throttle.
Which Battery Fits Your Pit Bike Build?
Building a diy electric pit bike is more than bolting parts together. The battery you choose shapes speed, ride time, and even how your electric pit bike build feels on tight tracks. If your diy electric pit bike setup is dialed in, every ride just hits better.
Choosing the Right Lithium-Ion Battery Capacity
Dialing in the right Lithium-ion battery for your diy electric pit bike starts with understanding numbers that actually matter.
-
Core Capacity Metrics
-
Amp-hours (Ah) – how much current your pack can supply over time.
-
Voltage (V) – directly linked to torque feel and power output.
-
Watt-hours (Wh) – total stored energy (Ah × V).
-
Battery capacity – the combined indicator of endurance.
-
-
Performance Matching
-
If your motor pushes high power output, raise Voltage (V).
-
For longer riding range, increase Watt-hours (Wh).
-
Heavier riders or cargo demand higher Amp-hours (Ah).
-
-
Real-World Comparison Table
| Voltage (V) | Amp-hours (Ah) | Watt-hours (Wh) | Estimated Riding Range (km) |
|---|---|---|---|
| 36V | 10Ah | 360Wh | 15–20 km |
| 48V | 15Ah | 720Wh | 25–35 km |
| 60V | 20Ah | 1200Wh | 40–55 km |
| 72V | 25Ah | 1800Wh | 60–75 km |
For a serious diy electric pit bike, many riders land in the 48V–60V zone. Brands like hezzo often tune their packs around balanced Watt-hours (Wh) so acceleration stays punchy without killing endurance.
Comparing Removable Battery Pack vs. Fixed Design
Picking between a Removable battery pack and a Fixed battery design changes daily use in subtle but real ways.
Removable setups give easy maintenance access. Pop it out, charge indoors, lock it up. Charging convenience is huge if your garage setup is tight. On a diy electric pit bike, that flexibility feels practical.
A fixed system, though, integrates tightly into the Battery enclosure and frame. That means better weight distribution, stronger weatherproofing, and often a cleaner look for your DIY e pit bike. Less rattle. More structural strength.
For urban riders working on an electric pit bike build, removable makes sense. Track-focused builds? Fixed design keeps the center of gravity low. hezzo frames are often engineered to support both styles without messing up balance.
Quick comparison:
-
Removable battery pack
-
✔ Easy swap
-
✔ Indoor charging
-
✖ Slightly higher enclosure weight
-
-
Fixed battery design
-
✔ Improved weight distribution
-
✔ Strong weatherproofing
-
✖ Less flexible charging location
-
Understanding Battery Management System and Charging Cycle Life
A solid Battery Management System (BMS) is the quiet hero inside every diy electric pit bike.
-
Core Protection Functions
-
Overcharge protection – stops voltage spikes.
-
Discharge protection – prevents deep drain damage.
-
Temperature monitoring – guards against overheating.
-
Cell balancing – keeps every cell aligned in voltage.
-
-
Why It Matters for Cycle Life
-
A proper Charging cycle means one full 0–100% use.
-
Higher Cycle life equals more seasons before replacement.
-
Poor management speeds up Battery degradation.
-
-
Smart Usage Habits
-
Charge to 80–90% for daily riding.
-
Avoid running to 0% unless needed.
-
Store at mid-level charge during off months.
-
For a diy electric pit bike, ignoring the Battery Management System (BMS) is like riding without checking brakes. Reliable systems, such as those integrated into hezzo battery platforms, actively manage temperature monitoring and cell balancing, stretching real-world cycle life far beyond cheap packs.
Build smart. Protect your battery. Then your diy electric pit bike won’t just run—it’ll rip every time you twist the throttle.
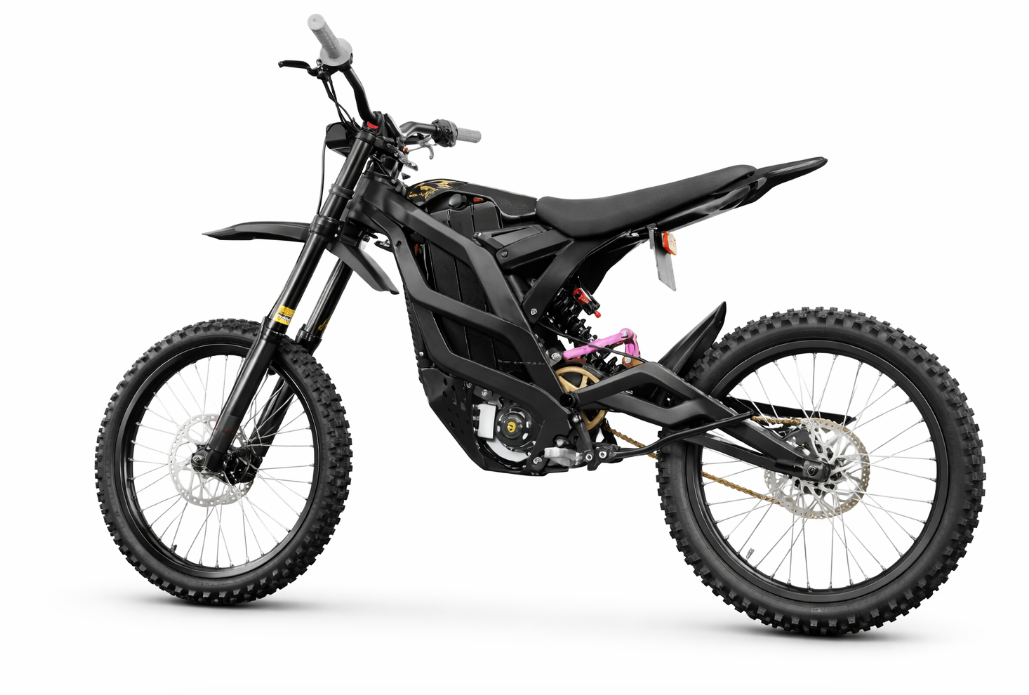
Frame Materials — Strength Versus Weight
Building a diy electric pit bike is not just about motors and batteries. The frame decides how your electric pit bike feels on jumps, corners, and rough tracks. From garage-built projects to upgraded builds from hezzo, material choice shapes durability, comfort, and raw riding attitude.
Aluminum Alloy Frame
For many riders working on a diy electric pit bike, aluminum feels like the sweet spot between control and speed. Its lightweight nature cuts overall mass, helping electric pit bike acceleration snap harder off the line.
-
Core Material Traits
-
Structural Benefits
-
High strength-to-weight ratio keeps the frame stiff without adding bulk.
-
Natural corrosion resistance handles mud and wet trails.
-
-
Fabrication Advantages
-
Clean machinability allows precise tube shaping.
-
Solid weldability supports custom geometry tweaks.
-
-
-
Performance in DIY Builds
-
Trail Riding
-
Quick direction changes feel smooth.
-
Reduced rider fatigue over long sessions.
-
-
Track Use
-
Lighter chassis improves jump control.
-
Maintains reliable durability under repeated stress.
-
-
Many riders building a diy electric pit bike say aluminum just feels alive—responsive, sharp, and easy to tune.
Steel Frame Construction
Steel still has loyal fans in the electric pit bike crowd. A diy electric pit bike built on steel trades a bit of weight for confidence and grit.
-
Mechanical Characteristics
-
Structural Strength
-
Superior high tensile strength for load handling.
-
Strong impact resistance in rocky terrain.
-
-
Physical Properties
-
Greater density adds planted stability.
-
Balanced rigidity for predictable tracking.
-
-
-
Practical Ownership Factors
-
Workshop Friendly
-
Easy repairability after crashes.
-
Trusted weldability for frame mods.
-
-
Budget Consideration
- Noted cost-effectiveness in custom builds.
-
BloombergNEF’s 2025 electric two-wheeler outlook noted that durability and lifecycle value are key drivers in small electric bike adoption, especially in off-road recreational markets.
Steel suits riders who want that solid, no-nonsense feel. Brands like hezzo balance material choice carefully, but for your electric mini bike project, it comes down to how you ride—and how hard you push it.
How To Solder Wiring Harness Properly
Building a diy electric pit bike is exciting, but messy wiring can ruin the vibe fast. Clean solder joints keep your electric pit bike build running smooth and safe. If you're serious about a DIY e‑pit bike project, this is where solid skills really pay off.
Preparing Wires and Selecting Solder for Reliable Joints
Getting your wire preparation right sets the tone for your whole diy electric pit bike project.
-
Wire Setup Basics
1.1 Clean cuts
-
Use proper wire stripping tools matched to your wire gauge.
-
Avoid nicking copper strands.
1.2 Surface prep
-
Light joint cleaning with fine sandpaper.
-
Apply minimal flux application for smooth bonding.
-
-
Smart solder selection
2.1 For motor and battery leads
- Rosin-core solder, 60/40 tin-lead or quality lead-free.
2.2 For controller signal wires
- Thinner diameter solder improves precision.
| Wire Gauge (AWG) | Recommended Solder Diameter (mm) | Typical Use in Electric Pit Bike |
|---|---|---|
| 10–12 | 1.6–2.0 | Battery leads |
| 14–16 | 1.0–1.6 | Motor wires |
| 18–20 | 0.8–1.0 | Signal wiring |
| 22–24 | 0.6–0.8 | Sensors, throttle lines |
A clean start means fewer voltage drops and better throttle response on your diy electric pit bike.
Heating Technique: Ensuring Strong Mid-Drive Motor Connections
Strong joints depend on controlled soldering iron temperature and steady heat application.
-
Heat Control
1.1 Set iron between 350–400°C for most motor wires.
1.2 Touch both wire and connector to promote even solder flow.
-
Protecting Components
2.1 Avoid overheating nearby controller parts.
2.2 Focus on joint integrity instead of rushing.
-
Strength Check
-
Let cool naturally.
-
Light tug test confirms connection strength.
-
“Improper electrical connections remain one of the top failure points in light electric vehicles,” noted a 2025 International Energy Agency EV outlook update, highlighting reliability issues in small-format e-mobility systems.
That matters when your electric pit bike build hits full torque.
Insulating with Heat Shrink Tubing for Safety
After soldering, protection is non‑negotiable for any diy electric pit bike.
-
Choosing heat shrink tubing
1.1 Match correct shrink tubing size to cable diameter.
1.2 Select dual-wall tubing for added moisture resistance.
-
Application Process
2.1 Slide tubing on before soldering.
2.2 Center over joint.
2.3 Use careful heat gun usage to avoid burns.
-
Safety Payoff
-
Improved insulation
-
Better wire protection
-
Higher electrical safety in rough riding conditions
-
Brands like hezzo design electric pit bike frames with tight cable routing, so neat insulation really counts. If you’re crafting a serious diy electric pit bike, clean solder and proper sealing separate a backyard build from something that actually rips.
Unstable Wiring? Secure Connections In 3 Steps
If your diy electric pit bike cuts out mid-ride, jerks under throttle, or just feels weak, loose wiring is often the hidden villain. A solid electric pit bike build depends on tight, clean connections. Let’s lock it down the smart way.
Step 1: Cleaning Contacts for Optimal Electrical Flow
When working on a diy electric pit bike, stable rated motor voltage starts at the terminals. Corrosion, dust, and moisture mess with electrical flow and dull your throttle control type response.
-
Check battery terminals
-
Inspect motor phase connectors
-
Review controller input leads
For a cleaner, longer-lasting electric pit bike build, focus on:
-
Disconnect the battery pack safely.
-
Use contact cleaner on copper terminals.
-
Lightly brush oxidation from spade connectors.
-
Re-seat connectors firmly.
For riders tuning a diy electric pit bike at home, here’s a quick reference table:
| Component | Ideal Resistance (mΩ) | Cleaning Interval (Hours) | Voltage Drop Limit (V) |
|---|---|---|---|
| Battery Terminal | ≤ 2 | 20 | 0.05 |
| Motor Phase Connector | ≤ 3 | 15 | 0.08 |
| Controller Input Lead | ≤ 2 | 25 | 0.05 |
| Throttle Connector | ≤ 5 | 30 | 0.02 |
Brands like hezzo design connectors to reduce oxidation risk, which makes life easier for any diy electric pit bike builder.

Step 2: Crimping Connectors to Prevent Motor Torque Loss
Loose crimps steal peak motor torque. That punch you expect from your electric pit bike fades fast when resistance climbs.
-
Use a proper crimping tool
-
Match gauge to AWG wiring
-
Avoid twisting bare strands by hand
For a diy electric pit bike upgrade:
-
✔ Tight mechanical bond
-
✔ No exposed conductor strands
-
✔ Firm pull-test pass
Inside a typical setup:
-
Power Circuit
-
Battery → Controller
-
Heavy-gauge silicone wire
-
Insulated ring terminal
-
-
-
Drive Circuit
-
Controller → Hub Motor
-
Phase wire set
-
Heat-shrink seal
-
-
A clean crimp means steady acceleration and no weird power dips.
Step 3: Applying Cable Ties and Sleeves for Strain Relief
Vibration kills weak wiring. A diy electric pit bike hits bumps hard, so strain relief isn’t optional.
Secure your wiring harness with:
-
Heat-resistant cable sleeves
-
UV-stable zip ties
-
Flexible spiral wrap
For long-term durability:
-
Route wires away from rear suspension travel
-
Leave slight slack near the steering stem
-
Anchor near the frame mount points
Many riders upgrading to a hezzo controller kit notice improved water resistance rating once cables are properly sleeved and supported. Small details, big difference. Your diy electric pit bike will feel sharper, stronger, and way more reliable on every ride.
Final Assembly Checklist Before First Ride
Before firing up your diy electric pit bike, take a breath and run through this final setup. A solid electric pit build isn’t just about speed; it’s about control, balance, and safety. If you're finishing a diy electric pit bike project—maybe even upgrading with hezzo components—this checklist keeps your electric pit bike build tight and trail‑ready.
Inspect Front Suspension Fork and Rear Shock Absorber Settings
- Suspension setup affects handling, comfort, and safety.
-
Front suspension fork
-
Check spring preload
- Adjust sag to 25–30% of total travel range
-
Fine-tune damping adjustment
-
Compression: reduce bottom-out
-
Rebound: prevent pogo effect
-
-
Inspect seal integrity for oil leaks
-
-
Rear shock absorber
-
Match preload to rider weight
-
Confirm smooth rebound action
-
Measure full travel range under load
-
A properly tuned diy electric pit bike feels planted, not bouncy or stiff.
Test Hydraulic Disc Brakes and Check Rotor Size Fit
-
Inspect braking components:
-
Hydraulic brake levers firmness
-
Brake calipers alignment
-
Brake pads thickness
-
Brake fluid level clarity
-
Tight mounting bolts
-
-
Verify rotor size compatibility with frame and calipers.
-
Measure stopping response:
| Speed (km/h) | Rotor Size (mm) | Stop Distance (m) | Lever Feel | Result |
|---|---|---|---|---|
| 20 | 160 | 3.2 | Firm | Pass |
| 30 | 160 | 5.8 | Stable | Pass |
| 40 | 180 | 8.5 | Strong | Pass |
| 45 | 180 | 10.2 | Slight fade | Monitor |
| 50 | 203 | 11.6 | Solid | Pass |
Strong stopping power is non‑negotiable for any diy electric pit bike.
Verify Off-Road Tires Inflation and Wheel Diameter Alignment
-
Off-road tires
-
Set correct tire pressure (18–25 PSI typical)
-
Inspect tread pattern for uneven wear
-
-
Wheel system
-
Confirm wheel diameter matches fork spacing
-
Examine rim condition
-
Tighten and balance spoke tension
-
Check hub alignment
-
If the bike tracks straight at low speed, your electric pit bike build is dialed in.
Calibrate LCD Display Screen and Throttle Control Type
-
Power system check
-
Battery indicator accuracy
-
Secure wiring connections
-
-
Display setup
-
Program LCD display wheel size
-
Verify speedometer reading
-
-
Control system
-
Test throttle control smoothness
-
Inspect Hall sensor response
-
Adjust user interface assist levels
-
hezzo display units are known for clear readouts, making diy electric pit bike tuning way easier.
Perform a Test Run for Top Speed Capability and Climbing Ability
• Start with low-speed roll test
• Gradually increase acceleration
• Monitor motor performance temperature
• Track battery range
Then push it:
-
Straight-line test
-
Record top speed
-
Evaluate handling characteristics
-
-
Hill climb
-
Measure climbing gradient ability
-
Note torque consistency
-
A well-built diy electric pit bike should climb smoothly, brake confidently, and feel tight through turns. If it passes all that, your diy electric pit bike isn’t just assembled—it’s ready to rip.
FAQs about Diy Electric Pit Bike
What tools do I need to build a diy electric pit bike?
Building a diy electric pit bike feels raw and mechanical, so your tools matter:
-
Torque wrench – keeps motor mounts tight and protects peak motor torque output.
-
Multimeter – checks rated motor voltage and battery voltage before sparks fly.
-
Soldering iron + heat shrink – locks brushless DC motor or mid-drive motor wiring in place.
Add basic hex keys and tire levers for spoked wheels and off-road tires. Good tools reduce wiring stress and protect your lithium-ion battery from costly mistakes.
How does battery choice affect performance?
Battery choice decides how wild your ride becomes.
-
Battery capacity → shapes maximum range per charge.
-
Battery voltage → influences acceleration rate and top speed capability.
-
Battery management system → guards charging cycle life and prevents overheating.
A removable battery pack adds convenience, while a higher-capacity lithium-ion battery supports stronger climbing ability on steep dirt tracks.
Which frame and suspension setup should I choose?
Your frame defines how the bike feels under pressure.
-
⚙ Aluminum alloy frame: lighter, sharper handling, great for quick direction changes.
-
⚙ Steel frame construction: heavier but boosts payload capacity and absorbs trail vibration.
Pair it with a front suspension fork and rear shock absorber, or go full suspension system for aggressive terrain. Smart frame geometry keeps the bike stable when peak motor torque hits hard.
What braking and tire setup works best off-road?
Speed means nothing without control. Hydraulic disc brakes offer sharper brake lever feel and better heat control than mechanical disc brakes. Larger rotor size improves stopping force, especially with regenerative braking systems.
For traction:
-
Knobby or fat tires improve climbing ability.
-
Larger wheel diameter rolls smoother over rocks.
-
Tubeless ready setups reduce punctures.
The right mix keeps your diy electric pit bike planted when the trail fights back.
How should I test my diy electric pit bike before riding?
A calm inspection prevents chaos later.
Check these systems before opening the throttle control type to full twist:
| Component | What to Confirm | Why It Matters |
|---|---|---|
| Motor | Motor power output & wiring secure | Protects brushless DC motor from failure |
| Battery | Stable battery voltage on LCD display screen | Prevents sudden power drop |
| Brakes | Hydraulic disc brakes responsive | Controls top speed capability |
| Suspension | Front suspension fork smooth travel | Improves stability |
| Controls | Speedometer function & pedal assist levels accurate | Keeps riding predictable |
Finish with a slow test run, listening for vibration and feeling throttle response. Your diy electric pit bike should feel tight, balanced, and ready to tear through dirt.
Aktie:
The Ultimate Guide to Building Your Own DIY Electric Pit Bike
How to Build a DIY Electric Dirt Bike: The Complete Step-by-Step Guide