
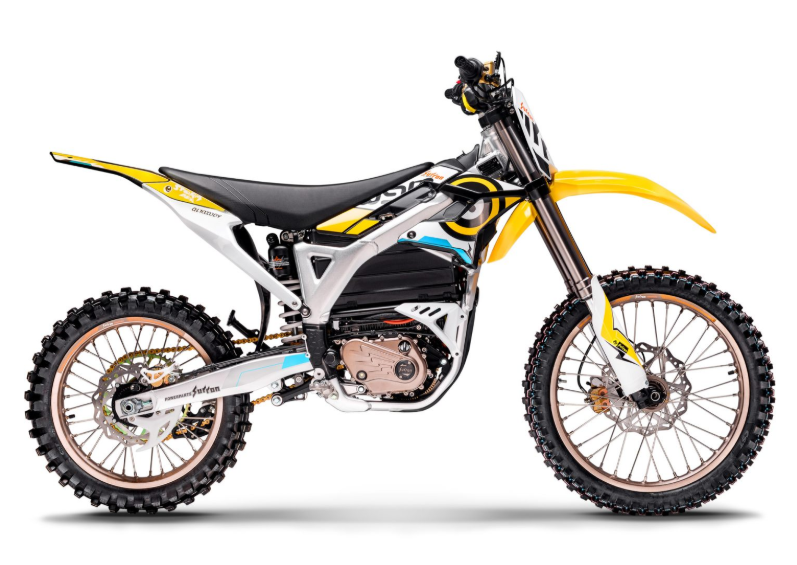
Tired of weak rides and hype? Build a diy electric pit bike that bites hard with real torque, smart parts, and no overpriced nonsense.
Building a diy electric pit bike isn’t just a garage project—it’s a middle finger to overpriced toys and mystery specs. You want torque that snaps like a rubber band, a battery that doesn’t quit halfway up the hill, and parts that make sense—not marketing fluff. Most riders get burned by shiny ads and end up with a bike that wheezes instead of rips.
Here’s the thing: when you build it yourself, you stop guessing. You start knowing. The motor isn’t just “powerful”—it’s matched to your terrain. The suspension isn’t decorative—it saves your spine on rocky trails.
“Interest in EV adoption remains strong,” notes Deloitte’s 2024 Global Automotive Consumer Study. Translation? Electric is no fad.
So buckle up. We’re about to turn confusion into horsepower and bolt-by-bolt confidence.
5 Essential Parts for Your Electric Pit Bike Build
Building a diy electric pit bike is more than bolting parts together. It’s about matching power, balance, and control so your electric pit bike build feels tight, quick, and safe on dirt or track.
Brushless DC Motor: Choosing Rated Power Output and Torque Rating
When planning a diy electric pit bike, your motor choice sets the vibe. Focus on layered specs instead of just big numbers.
-
Core Motor Type
-
Brushless DC Motor
-
Higher Efficiency
-
Lower maintenance
-
Better Cooling System options
-
-
-
Power Specs
-
Rated Power Output (continuous watts)
-
Peak burst output
-
Matching Voltage
-
-
Performance Indicators
-
Torque Rating for launch feel
-
Target RPM for desired top speed
-
If your electric pit bike project needs punchy starts and hill pulls, prioritize torque over flashy watt claims. A balanced setup keeps heat down and fun up.
Hub Motor vs Mid-Drive Motor: Key Performance Differences
Motor layout changes how your diy pit bike rides.
-
Motor Placement
-
Hub (rear wheel)
-
Mid-drive (center frame)
-
-
Ride Dynamics
-
Weight Distribution
-
Torque Delivery
-
Hill Climbing Ability
-
-
Ownership Factors
-
Maintenance needs
-
Real-world Efficiency
-
Achievable Top Speed
-
Hub systems feel simple and clean. Mid-drives tap the drivetrain, giving better climbing and balance. Many riders building with hezzo kits prefer mid-drive for tighter control on rough trails.

Lithium-Ion Battery Pack with High Capacity and Charge Cycle Life
Your battery defines range and mood on every diy electric pit bike ride.
-
Battery Chemistry: modern lithium-ion
-
Capacity (Ah) for distance
-
Correct Voltage (V) for motor match
Key technical comparison:
| Pack Option | Capacity (Ah) | Voltage (V) | Est. Range (km) | Weight (kg) |
|---|---|---|---|---|
| A | 15 | 48 | 25 | 7.5 |
| B | 20 | 48 | 35 | 9.0 |
| C | 25 | 60 | 45 | 11.5 |
| D | 30 | 72 | 60 | 14.0 |
| E | 35 | 72 | 70 | 16.5 |
Under the shell:
-
High Discharge Rate for acceleration
-
Long Charge Cycle Life
-
Reliable Battery Management System (BMS)
-
Sensible Weight for handling
Choose smart, not just big.
Full Suspension or Front Fork: Frame Geometry and Shock Absorption
Comfort matters when your electric pit bike build hits ruts and jumps.
-
Suspension Type
-
Full suspension
-
Rear Shock Travel
-
Tuned Rear Shock Linkage
-
-
Front-only
-
Quality Damping Adjustment
-
Correct Spring Rate
-
-
Frame factors:
-
Strong Frame Material
-
Balanced Frame Geometry
-
Proper sag setup
Full suspension adds traction. A dialed front fork can still keep a lighter diy electric pit bike playful and sharp.
Hydraulic Disc Brakes with Optimal Rotor Size and Lever Feel
Stopping power saves builds and bones.
-
Brake Type: hydraulic over cable
-
Correct Rotor Diameter for speed class
-
Solid Caliper Type
Fine-tuning checklist:
-
Match Brake Pad Material to terrain
-
Adjust Lever Reach Adjustment for comfort
-
Use proper Brake Fluid Type
-
Confirm clean Hose Length routing
A crisp lever feel gives confidence. Brands like hezzo often spec hydraulic systems because smooth braking completes a serious diy electric pit bike setup.
Frames, Forks, & More: Bike Component Layers
Building a diy electric pit bike is not just about slapping on a motor and hoping it rips. The frame, fork, suspension, and wheels decide how your electric pit bike build feels on dirt, gravel, or backyard jumps. If you’re serious about a diy electric bike project, these layers matter.
Aluminum Alloy Frame vs Steel Frame: Strength and Weight Trade-Offs
When choosing frame material for a diy electric pit bike, break it down like this:
-
Performance Core
-
Aluminum alloy
-
Lower overall weight
-
Higher frame rigidity
-
Faster acceleration response
-
-
Steel frame
-
Greater tensile strength
-
Better vibration damping
-
Higher durability under load
-
-
-
Weight Comparison & Strength Data
| Frame Type | Avg Weight (kg) | Tensile Strength (MPa) | Payload Capacity (kg) |
|---|---|---|---|
| Aluminum Alloy | 3.2–3.8 | 250–400 | 110 |
| Chromoly Steel | 4.5–5.5 | 400–700 | 140 |
| Mild Steel | 5.5–6.5 | 350–500 | 130 |
-
Real-World Feel
-
Lighter builds boost agility.
-
Steel smooths out chatter on rough trails.
-
For riders upgrading a diy pit bike electric setup, hezzo frames balance weight and strength without feeling flimsy.
Front Suspension Fork Selection for Climbing Ability
Dialing in a suspension fork changes climbing performance fast.
-
Key Specs
-
Travel length: 100–140 mm works well for electric pit bikes.
-
Steerer tube diameter: 1 1/8" is common and stable.
-
Fork offset: Affects steering control uphill.
-
-
Tuning Priorities
1) Set preload to match rider weight.
2) Adjust damping adjustment to limit front-end bob.
3) Use suspension lockout on smooth climbs for better power transfer.
Short climbs feel punchy. Steep hills demand traction. A properly tuned fork keeps the front tire planted so your diy electric pit bike doesn’t wander off line.
Rear Shock Absorber Tuning to Maximize Power Efficiency
A loose rear end wastes energy. A tight one beats you up.
-
Shock Type
-
Air spring: lighter, adjustable.
-
Coil spring: consistent feel, strong under heavy load.
-
-
Setup Flow
-
Set sag adjustment to 25–30%.
-
Fine-tune rebound damping so the bike doesn’t pogo.
-
Balance compression damping for traction and smooth power transfer.
-
On an electric pit bike build, efficient suspension means more throttle turns into forward motion, not bounce.
Wheel Diameter, Spoked Wheels, and Knobby Tire Tread Patterns
Wheels decide how your diy electric pit bike grips and rolls.
-
Wheel diameter
-
12–14 inch: tighter control
-
14–17 inch: better obstacle rollover
-
-
Spoked wheels with strong rim material absorb impacts better than cast options.
-
Tire Setup
-
Choose wider tire width for stability.
-
Pick aggressive knobby tread for dirt traction.
-
Adjust tire pressure to balance rolling resistance and grip.
-
A well-matched wheel and tire combo keeps your diy electric pit bike planted, playful, and ready to rip.
DIY Electric Pit Bike Battery Types Compared
Building a diy electric pit bike is all about balance—power, weight, range, and budget. The battery you choose shapes how your electric pit bike feels on the track or in the backyard. From lightweight packs to budget-friendly bricks, every diy electric pit bike build reacts differently. Let’s break it down in real talk.
Lithium-Ion Battery
When riders upgrade a diy electric pit bike, lithium-ion usually tops the list.
-
Core Performance Factors
-
Energy density
-
Higher Wh/kg means longer rides per charge
-
More compact battery pack design
-
-
Weight
-
Lighter frame feel
-
Faster throttle response
-
-
Charging speed
-
Shorter downtime
-
Better for daily riding
-
-
-
Ownership Considerations
-
Lifespan: Often 800–1500 cycles
-
Cost: Higher upfront, lower long-term replacement rate
-
Safety features: Requires BMS for heat and voltage control
-
For a diy electric pit bike chasing speed and range, lithium-ion just feels right. Brands like hezzo focus heavily on this setup for serious performance builds.
Lead-Acid Battery
Still popular for entry-level electric pit bike builds.
-
Budget Appeal
-
Low cost
-
Easy replacement
-
-
Trade-Offs
-
Heavy weight
-
Lower energy density
-
Slower charging time
-
-
Maintenance
-
Regular checks
-
Shorter lifespan
-
| Battery Type | Energy Density (Wh/kg) | Avg Weight (48V Pack) | Charge Cycles | Charging Time |
|---|---|---|---|---|
| Lithium-Ion | 150–260 | 12–18 kg | 800–1500 | 3–5 hrs |
| Lead-Acid | 30–50 | 25–35 kg | 300–500 | 6–8 hrs |
| NiMH | 60–120 | 20–28 kg | 500–800 | 4–6 hrs |
| LFP Variant | 120–160 | 18–24 kg | 1500–3000 | 3–5 hrs |
A diy electric pit bike with lead-acid works, but acceleration feels slower due to the extra mass.

Nickel-Metal Hydride Battery
NiMH sits in the middle ground for a diy electric pit bike.
-
Performance Profile
-
Moderate energy density
-
Noticeable weight
-
-
Technical Traits
-
Lower memory effect than older nickel batteries
-
Stable but sensitive to temperature sensitivity
-
-
Budget Angle
-
Mid-level cost
-
Average charging speed
-
For riders testing electric mini bike setups without jumping to premium lithium, NiMH can make sense. Some hezzo custom options even allow flexible battery swaps, giving builders room to experiment without locking into one chemistry.
Final Assembly: Frame to Finishing Touches
Building a diy electric pit bike is where the real fun kicks in. This is the moment your electric pit build stops looking like spare parts and starts acting like a machine. From torque alignment to that first throttle twist, your diy electric pit bike finally comes alive.
Securing Motor to Frame and Aligning Torque Output
For a diy electric pit bike, mounting the motor isn’t just tightening bolts and calling it a day.
-
Motor Positioning
-
Attach the Motor Mount to solid Frame Brackets.
-
Use an Alignment Jig to keep sprockets straight.
-
Check Chain Tension before locking anything down.
-
-
Torque Control
-
Install a Torque Arm to prevent axle spin.
-
Confirm proper Bolt Tightness with a torque wrench.
-
Spin the drivetrain by hand; listen for drag or grind.
-
-
Fine Adjustment
-
Re-check chain line under light throttle.
-
Watch how torque transfers during slow rotation.
-
A clean motor install keeps your electric pit bike diy project smooth and avoids early chain wear.
Wiring the Battery System: Voltage Rating and Removable Pack Setup
Power is everything in a diy electric pit bike build.
-
Core Setup
-
Match the Battery Pack voltage to your Voltage Regulator and controller.
-
Secure the Battery Management System inside the casing.
-
-
Connection Layout
-
Route the Wiring Harness cleanly along the frame.
-
Main power line → Fuse Holder → Controller
-
Charge line → Charge Port
-
Output → heavy-duty Connectors
-
-
-
Removable Pack Fit
-
Lock the pack firmly.
-
Test quick removal without stressing wires.
-
Brands like hezzo design battery bays that make diy electric pit bike maintenance way less annoying.
Installing Throttle Type, LCD Display, and Controller Programming
Now it starts to feel real.
-
Hardware Install
-
Mount the Throttle Grip snug on the bar.
-
Position the LCD Screen near your natural sight line.
-
Secure the Controller Unit in a ventilated area.
-
-
Wiring Logic
-
Connect Sensor Wires carefully.
-
Link via Programming Cable.
-
-
Tuning
-
Adjust Parameter Settings in the User Interface:
-
Pedal assist levels
-
Acceleration ramp
-
Speed cap
-
-
A dialed setup transforms your diy electric pit bike from jumpy to smooth. hezzo controllers are known for stable tuning and easy menus.
First Test Ride: Top Speed, Range per Charge, and Acceleration Rate Checks
Take it to a safe Test Track and ride smart.
-
Performance Check
-
Monitor Speedometer for top speed.
-
Watch the Battery Gauge under load.
-
Time bursts with an Acceleration Timer.
-
-
Safety Review
-
Test Braking Performance at low speed.
-
Feel Handling Dynamics in corners.
-
-
Comfort & Heat
-
Notice Ride Comfort over bumps.
-
Stop and check motor warmth.
-
That first ride on your diy electric pit bike hits different. Smooth throttle, clean pull, solid braking—that’s when the electric pit bike build feels worth it. With the right setup and brands like hezzo backing key components, your diy electric pit bike is ready to rip.
FAQs about Diy Electric Pit Bike
What motor setup gives a diy electric pit bike real punch?
Power is the heartbeat of a diy electric pit bike, and the motor choice changes everything.
-
Brushless DC motor basics
-
Match rated power output to your daily riding needs.
-
Look at peak power for hard launches.
-
A strong torque rating boosts climbing ability and sharp acceleration rate.
-
-
Hub motor vs mid-drive motor
-
Hub motor: simple, quiet, low maintenance, but moderate climbing power.
-
Mid-drive motor: uses gearing, improves power efficiency, balances weight across the frame geometry, and feels stronger on steep trails.
-
A weak motor feels flat. The right one snaps forward the moment you twist the throttle.
Which battery system keeps range high without killing the ride feel?
Battery choice decides how far you ride—and how heavy the bike feels.
-
Lithium-ion battery is the go-to: light, strong energy density, long charge cycle life.
-
Match the voltage rating to the controller to avoid overheating.
-
Higher battery capacity = longer range per charge, but adds weight.
-
A removable battery cuts charging time stress and makes daily charging easier.
Short summary: balance range per charge with total bike weight. Too heavy, and top speed and handling suffer.
How do frame and suspension change control at high speed?
The frame is the spine; suspension is the shock absorber between you and chaos.
Frame material comparison
| Frame Type | Ride Feel | Payload Capacity | Trail Behavior |
|---|---|---|---|
| Aluminum alloy frame | Light, quick acceleration rate | Moderate | Agile on tight turns |
| Steel frame | Stable, vibration damping | Higher | Planted on rough ground |
Add control with:
-
Full suspension for aggressive off-road riding
-
A tuned front suspension fork and rear shock absorber to keep tires gripping
A stiff setup rattles your confidence. A balanced one lets you push harder.

What safety and control upgrades matter before the first real ride?
Speed without control is a bad ending waiting to happen.
-
Braking system
-
Hydraulic disc brakes offer stronger bite and smoother brake lever feel.
-
Proper rotor size improves stopping power at high top speed.
-
Regenerative braking adds slight energy recovery and smoother deceleration.
-
-
Tires and wheels
-
Knobby tires with deep tire tread pattern grip dirt.
-
Choose correct wheel diameter and tire width for stability.
-
Spoked wheels absorb trail impacts better.
-
-
Control and display
-
Responsive throttle type matters for clean acceleration.
-
LCD display with speedometer function tracks range, speed, and power efficiency.
-
Fine-tuned controller programming sharpens pedal assist levels and throttle response.
-
Test acceleration rate, brake response, and climbing ability before full-throttle runs.
When everything responds instantly, the bike feels alive in your hands.
Compartir:
3 Best E Bike Dirt Bike for Sale Models You Can Buy Today
How to Build a DIY Electric Dirt Bike: The Ultimate Step-by-Step Guide